Showing posts with label Sewing. Show all posts

Wednesday, June 5, 2013

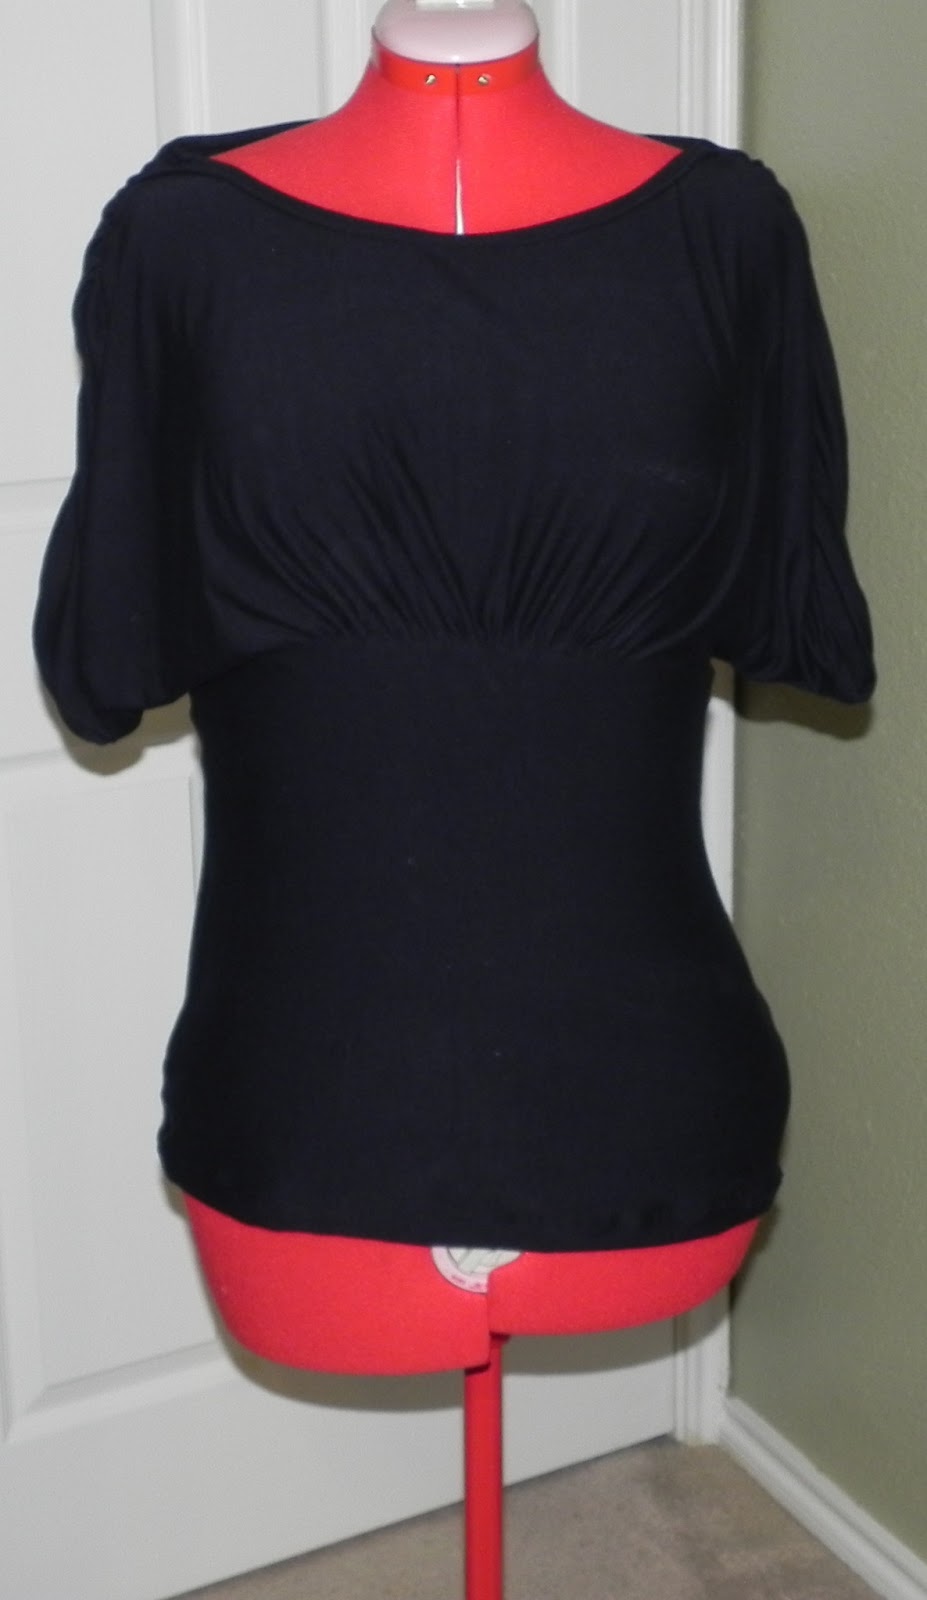
Butterick 5497


Before I actually bought this pattern, I kept hesitating on it.  I would pick it up, have it in my cart and then put it back.  I really didnt think it would look good after being sewn up, finally one day I decided to bite the bullet and buy it because it was on sale.
I also googled it to see other peoples versions of the patterns and they all looked awesome so I figured I would give it a shot.


 The top is loose but the gathering looks nice and is quite flattering.  I cant wait to actually wear it out somewhere.
I loved the back of this shirt, I will have to wear it with a tank top as the low back shows off bras.

I used some spare black material I had, I wanted to make sure that I actually liked the style before I tried making it with some of my good fabric.
And....fin.

Tuesday, June 4, 2013

Finished Colour Block Shirt (with sleeves)

I know the pictures to this are sort of terrible, but since losing my "sewing area" and now sharing it with my hubbys office, it's cramed quarters, and nowhere to take pictures. So here it goes.

Here is the front section cut out but not sewn together.  I decided to put my purple colour in the middle to break up the blue/green I had going on
 Here is the top sewn together (but not pressed).  At this point it was that I realised that I made a good choice in the colour scheme (and happy I had to use brown instead of navy blue material). 


 Next I cut out sleeves.  I sort of "franken-patterned" this top.  I dug into my pattern stash and grabbed the first one that I saw had sleeves I had sewn before. Simplicity 4076 (which is apparently still in print)


I cut out the back and the sleeve at the same time.

 Sewed the shoulders together
 Then sewed on the sleeves (after that I forgot to take pictures).  I sewed up the side seams, and hemmed the bottom of the shirt with a twin needle.


I ended up cutting out bands to go around the sleeves because they weren't long enough, as well as making a make-shift neckband for the collar of my shirt. It doesn't look "perfect" on the dummy, but I am really happy with how it turned out.  however I really do need to get my serger in to be looked at, it's not running like it should be.

Wednesday, February 6, 2013

My future Cambie Dress

This is the back of the dress (sans Zipper).  Don't worry, the back will get sewn up eventually

Front of the dress.  I have yet to sew the lining on, so the straps on properly on their either

A close up of the fabric I used.  A teeny tiny sequins sits in the middle of all the flowers.
Booyah, I actually kept my promise (but I almost forgot at the same time).  I have made a skirt out of this fabric previously, but had enough to cut out View A of the Cambie dress.  I still have to have a crack at View B, but first I must finish this dress.  The lining of the dress is a bright magenta because I had a shit ton of it lying around, so why not?
Next, I have to get an invisible zipper foot for my machine, and then I will sew in the zipper, after that comes the lining, and then hemming the dress, aaaaand we're done after that.

Friday, January 4, 2013

My ReSEWlutions

Ah here we are, 4 days into the New Year, and I have not even written on EITHER of my blogs for a long time.  I know I said one of my resolutions this year would be to Sew more, and write on this blog more.  So I really need to stop slacking.  I started thinking this morning "Ok, you want to sew more, but what to you want to sew more of?".  It hit me that, much like writers block, I get sew-ers block.  I will sit down and be ready to sew something and then think F#*%, what do I want to sew?  I spend about a half hour humming and hawing and then before I know it, the babies are up from their naps.
Mind you my work-out schedule is about to change so I can probably sew more after hours if I get home from the gym by 7pm and not 9pm.  I need to start a list of things I want to sew and maybe the block won't seem so hards when it comes time to sit down and focus on my task at hand.
So here are things I want to get accomplished this year.
  • Finish at least one UFO a month (I know it seems like a small task, but in the bigger picture, I have a ton of fabric that needs to get sewn)
  • Make a mock up dress for my friends wedding (to see if the dress is appropriate attire for a bridesmaid to wear).
  • Sew a skirt that I will actually wear out in public
  •  Sew a shirt with more structure (vs. a jersey knit t-shirt)
  • Start sewing "gift bags", and using scrap material as ribbon so I have them on hand for birthday parties for quick wrapping duties.
  • Only buy patterns that I know I can and will use more than once
  • Keep interfacing on hand at all times
  • Focus more on sewing a garment properly than how quickly I can sew it.
  • Learn more about my measurements and how to read a pattern and correctly cut out the right size
  • Blog both my successes and failures in sewing (because it might appear that I'm not sewing, but I am. I'm just not proud of all of them)
So, there it is, my shortlist of things that I would like to achieve in the sewing world this year.

Wednesday, December 12, 2012

Another UFO finished.

I have finally finished a top that I previously blogged about.  The original top, even though unfinished was supposed to look like this
so smiley and happy and yellow that day.

 I decided that there was nothing redeeming about the top as it was so I changed it, only slightly.  You can't see it in the top picture but there was a white band that was suppose to go on the bottom.  It wasn't cute.  The shirt was too long and the white band just made it worse.
I took that off.  I also took off the white neckband and traded it for grey (the stars on the shirt are silver, so why not?).  I liked the crossed over look but it never sat right on me so I turned the shirt backwards, and created a scoopneck top instead.


Here is the back.


It's still a bit tight, but it's not as horrible as the top photo.  I will actually wear this out in public when the time is right....

Friday, October 26, 2012

Argyle Scoopneck

I ordered this Argyle fabric about 2 years ago from Mood Fabrics (I had a groupon).  I had been hesitating about what to make, and then I realised that the longer I hold on to this fabric, the more I will fret about what to make.  There is no perfect and ideal pattern for every single piece of fabric I buy and I always find myself hesitating to cut because I worry that there might be a better pattern down the line.  I finally decided "screw it" started cutting.

The pattern is from a previously loved top that I was no longer wearing.  I took it apart, traced it and viola!  The front is the argyle pattern and the sleeves and back is dark purple.

Somehow I was able to sew most of it during naptime, if it had not been for my machine acting up I would have finished all of it during naptime.

Tuesday, October 23, 2012

Quick "weight loss" fit

I bought this top online about 2 months ago from Rickis (damn I love that store), and I had a size large, colour purple sitting in my online shopping cart.  Well, Rickis played a cruel cruel joke on me, and when I checked out they said "oh, hey BTW the shirt colour and size you wanted are gone, your option is a XXL in grey/black".  I really liked the shirt, and it was a good deal, so I said "Since we are SUCH good friends, I WILL buy this shirt and I will take it in.

Without further ado, here is the before and after.

Before - big boxy, and shapeless
Oh hey, my "unimpressed face"


 After-fitted, and still long enough to suit me.
Oh, even better, my "pretend to smile" face
It was fairly quick, and I think in the end I took about 4-5 inches on each side, BAM.  The arms might not be completely matched underneath, but no one will be checking up in my business so it's ok.

Tuesday, September 18, 2012

This shirt needs more fedora....

As I've said before, I hate taking pictures for this blog, but using my "judy" isn't as fun because the tops I make look weird on it. I decided that my shirt needed more Fedora.
I started this shirt about 2 years ago, but then I got preggers and stopped working on it.

The  material itself is really thick/heavy, and super stretchy, so it took a few tries of taking it in to get it just right, The shoulders are supposed to have pleats throughout the sleeve I said "screw that" and just did one big pleat at the top shoulder seam.

I might make this top again but next time I will use a lighter-weight material, and figure out a way to just omit the pleats from the shoulder.

This was the pattern I used Simplicity 2283, view C (can't post a picture because it won't let me save it, boooo)


Friday, July 20, 2012

Refashioning my refashion

I didn't blog about this top after I had made it, so I will introduce you to it right now.

This shirt was originally 2 shirts and a tank top.  All stretched out, or worn out or holey.  They needed a new home, and it was either going to be back in my closet, or in a donation bin.
 I decided that I had nothing to lose by refashioning it, so I this was the start of the shirt (sorry no tank top pictures!)
The beggining of the shirt:

 This was the middle - a cowl neck shirt, with complete stain? how did I miss that!
 The end result was this tank top. I don't normally expose my arms, because if you couldn't tell I am afraid of the sun, but I needed to show 'em off for this post, YAY!

Tuesday, July 10, 2012

Ruchey Goodness Tutorial


If there are any fellow sewers out there who actually wanted to try out the ruchey goodness shirt, I have made a tutorial for you! Here are the following steps.


Remove original neckband (if you want to reuse it, seam rip it and set it aside)

Fold front of shirt in half, mark the distance from the fold of how much you want to take out (I removed 3 inches from the centre, 6 in total)

You can either leave the middle section folded, or unfold it like I did.  You will use this piece as a template for your new section.
Take your middle piece and lay it down on the other piece of fabric that will become your new middle piece. Add once inch around the side and the top (for seam allowance)  I added 20 inches from the bottom of the original hem.  Add as much or as little as you want for desired ruching effect.

Now gather the fabric.  I gathered mine by basting, and then hand gathering. 

Pin the right sides together of the new middle piece and the front sides.

Pin your neckband to the shirt. I have also re-hemmed the bottom and taken the sleeves up

Once you are all hemmed up, you are finished, voila!!

Yea, I hate taking my own picture, that is why I am wearing those glasses.

Monday, July 9, 2012

Ruchey goodness

I have been in love with a certain top from Rickis, but since I am not in Canada, and don't feel like paying a ton of money for the shirt, plus shipping, I decided to DIY.

The shirt in question that I am trying to recreate
Forgot to take a before picture of the original top, but this is the same shirt in black.

The end result

It didn't turn out exactly like the shirt, I should have added more length to the grey section so it gathered a lot more, and also should have made it less wide.  I will still wear it, but I am trying it again with the black shirt as we speak.

Sunday, July 1, 2012

Green Stripe Goodness


This shirt started out originally as a mens Large shirt.  I bought it from Old navy a while ago because it was green and stripey and I couldn't resist it.


Ignore the mess behind my mannequin, this is sort of the "catch all room".


It looks un-even, but trust me it's just the mannequin
I cut off the original neckline, dug through my scraps and found a dark emerald green that matched the green stripes on the shirt.

Elastic on the sleeves
I didn't end up cutting any length off the sleeves because I wanted to do that "elastic sleeve" look.  I found the middle of the sleeve and ran elastic from the bottom of the sleeve to the shoulder to make it look gathered.

The top ended up looking just the way I wanted, and it didn't take much effort since I didn't do much hemming of the shirt.

Monday, June 11, 2012

Blue Polka Dots

I think if I sew during nap time I could possibly get one dress or top or skirt done a week.  It might take me a while to bust through my stash but it seems like now that Ms.Baby takes longer naps I am able to do more.

I have had this skirt pattern on my -to sew- list for a while now (since before Ms.Baby came along).  

This is the skirt pattern cover

My finished product


The fabric for this skirt is a weird texture, sort of stiff, not very flowy, but I had enough of it that I wanted to try this skirt.  I think I will try making this skirt again, but next time I am going to use lighter weight material.  Until then I will be happy with the fact that I am finally able to start and  finish making my own clothes.

Wednesday, June 6, 2012

Eyelet Skirt

I better write quick before the children wake up, heh heh heh.

So I am slowly (and I mean slooooowly) busting through my fabric stash.  I seem to hit a wall whenever I go to sew something.  I either have the pattern, but not the fabric, or I have the fabric but them hem and haw over what to do with it.

This was the skirt that almost wasn't.....
My mom bought this black eyelet material for my sister about 6 years ago, she was supposed to make a graduation dress out of it.  She ended up buying a dress and I snatched up the material quickly.  There was quite a bit of it, so I used most of it to make a dress for a wedding I went to.  I found the rest of it on Monday, and was about to cut it into a top, but stopped and decided that I wanted a pretty skirt.  Because it is eyelet it is see through, so I found some other unused material in there and cut it into skirt lining.  I think it turned out better than I had hoped it would, and I will be wearing it out soon (date night perhaps?).

The first picture came out really dark because the flash was on, but it focused on a white bag that I cropped out.

 This is the skirt with the flash actually working.  I like the end result, even if it took a few days.
I should also mention that I just about killed my sewing machine a few weeks ago.  I had been messing with the tension, and then it just wouldnt work.  It took about a week of sewing, and yelling, and messing with the tension to get it back to "normal".  It will at least sew 2 pieces of cloth together now without unthreading completely.
Looks like its time to start saving for my "dream machine".

Friday, May 4, 2012

White Butterfly Top

I call this my Butterfly top because the sleeves are flowy, and remind me of wings.  I started this top about 3 years ago, I hated the sleeves, the shirt was too big and I kept taking it in and taking it in until it fit.  Then I tried to take the sleeves in to make them not so flowy.  I hated how it all turned out so I threw it in my pile of -works in progress-.  After I found it I couldnt figure out why I hated it so much, and after I saw what I had done to the sleeves I undid all the stitching and realised I loved the butterfly wing sleeves.  I added a band to the bottom of the shirt like I do with all of my tops so it would add length and I wouldnt have to hem it.
Yay.
Here is the top...
 Before
After

Tuesday, March 6, 2012

My name is Plex, Plex, p p p p p p p p p p Plex!

So Booger Bears birthday is tomorrow, and I really wanted to make him something that he might actually enjoy, so I decided on this.
It's Plex from Yo Gabba Gabba.  I can't quite be 100% sure that Plex is his favourite, but judging by the fact that he grabbed a Plex Beanie Baby over the rest of the crew leads me to beleive he does like him the best.

It took a few days of back and forth to the fabric store, but I finished it!
I had sewed the yellow head on first without interfacing and holy crap was it awful!  I took the yellow off, put some interfacing onto the back of the shirt as well as all the other pieces, and it looks loads better!  The eyes are crooked, and there are bits that I don't like, but at the end of the day, no one can look at that shirt and not think it looks just like a magic robot!
Also, just to add an extra bit of love to the shirt, the blue used to be a shirt I LOVED in highschool.  I saved the shirt, hoping to someday use it for myself again and then one day I must have been too scissor happy and I ruined the shirt.  I guess I had saved it for some reason and  since my parents are visiting from Canada and they brought down one of my old fabric bins I discovered it there.  Now, the blue is being passed down to my son and maybe he will love his blue shirt as much as I loved mine.

Fin.

Wednesday, February 8, 2012

Finish what you started!

I know I talk about sewing but I seldom actually follow through with it (all talk no action). I realized last night while trying to sleep (because that's when my brain won't shut down) that I just need to finished what I start, see it through to the end. So what I am planning on doing is cracking open my bucket of half finished projects (yes there is a bucket!) and either seeing a project to completion, or salvaging the project for something else. My first salvage will be the blue star dress that just never worked out and got tossed aside for something easier. My plans are to turn the bottom portion into a skirt and try and salvage the top half for something else. let's try for this weekend......

Thursday, February 2, 2012

Refashioned Top

Slowly refashioning clothes as I go along.  This used to be a plain black long sleeved top that I bought last year because I needed something to wear in the winter.  I hemmed the sleeves to 3/4 (can't stand long sleeves).  I took an old skirt that I never wore, and took the waistband and put it on the bottom of the shirt.  I cut the rest of the skirt to make a cowl neck type top.  Overall I like this top much better than what I had before and have already worn it out in public (yay for not being ashamed in clothes I refashioned!)


Still kind of a black boring top, but it looks a lot better than it started off as (which I had a picture!)  The bottom band is a little tight at the moment, but I don't usually pull my tops down like I did in the picture.